 by Leigh Lundin
Last week
by Leigh Lundin
Last week, I promised to show you how to create self-updating chapters. We're going to do much more than that today. No one's ever accused Microsoft of being user-friendly, so let's get started.
Stylin'
You've probably heard of styles and style sheets. If you're a writer and especially if you write novels, learning how to use them saves you time and effort in the long run.
Why? Why not select bold and italic as I've always done? And selecting double-space isn't so difficult, is it?
Because, Grasshopper, we'll do much more than that, and if you save them in a template (.dot or .dotx) then you don't have to redo them each time.
The screen shots come from MS Word 2011 for Macintosh but, depending upon which of the many versions of Word you're using, yours should prove similar.
Paragraphs
 Microsoft Word defaults to a style sheet called Normal. Through use, this generalized template can change over time. If your nine-year-old daughter creates notes for her special friends, you may end up with 18-point lavender Nuptials Script as your new setting. Even if that doesn't happen, Microsoft's Normal style isn't suitable for submission to editors; at the very least indentation and double-spacing won't be set. Microsoft Word defaults to a style sheet called Normal. Through use, this generalized template can change over time. If your nine-year-old daughter creates notes for her special friends, you may end up with 18-point lavender Nuptials Script as your new setting. Even if that doesn't happen, Microsoft's Normal style isn't suitable for submission to editors; at the very least indentation and double-spacing won't be set.
To create your new style settings, find the Style dialogue box. The two most recent versions of MS Word for Windows are exceptionally obnoxious– I know at least one editor who still uses MS Word 2003 and doesn't plan migrating any time soon. If you're using MS Word 2007 or 2010, check under that little gear icon for the Format menu and then look for Style. Macintosh users will see the Format menu where it's always been and can select Style from that. Click New. |
 We could use Normal style (not the same as Normal template– see what I mean?) but let's set a style specifically for the body of manuscripts. Call it 'paragraph' and type that in. Set the font to Times or Times New Roman unless your editor requests Courier. Professionals recommend 10- to 12-point as a standard type size. 10-point saves paper if you're writing a novel, 12-point saves your editor's eyes. If you're submitting electronically, by all means give your editor a break. We could use Normal style (not the same as Normal template– see what I mean?) but let's set a style specifically for the body of manuscripts. Call it 'paragraph' and type that in. Set the font to Times or Times New Roman unless your editor requests Courier. Professionals recommend 10- to 12-point as a standard type size. 10-point saves paper if you're writing a novel, 12-point saves your editor's eyes. If you're submitting electronically, by all means give your editor a break.
We've chosen 'paragraph' as our main formatting name, but you may want to create particular styles in the course of your novel, styles such as 'eMail' or 'telegram' or even 'suicide note'. |
 Note the Format submenu (which is not the same as the hi-level Format menu we used to navigate here) in the lower left corner. Select Paragraph, which we'll use to set block formatting. Note the Format submenu (which is not the same as the hi-level Format menu we used to navigate here) in the lower left corner. Select Paragraph, which we'll use to set block formatting. |
 Set the alignment to Left, the line spacing to Double, and then set the indentation to your editor's demands. In the US, that will likely be between a quarter and half inch; in the rest of the world, set the indentation to 1cm (which, at .39 inch also works as a good in-between setting for the USA). Set the alignment to Left, the line spacing to Double, and then set the indentation to your editor's demands. In the US, that will likely be between a quarter and half inch; in the rest of the world, set the indentation to 1cm (which, at .39 inch also works as a good in-between setting for the USA). |
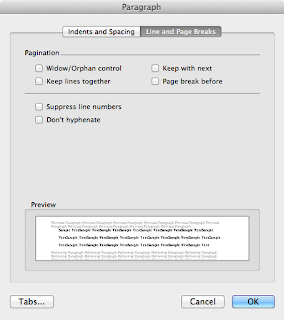
 At the top, click on the Line and Page Breaks button. Turn all those settings off, which helps editors estimate how much space your article will take. At the top, click on the Line and Page Breaks button. Turn all those settings off, which helps editors estimate how much space your article will take.
Click Okay and Apply, and if you wish, save your work as a template, say, My Novel.dot. |
Chapter and Verse
My friend, Claire, sent me her novel where she'd carefully (and manually) numbered each chapter, but chapter 17 appeared twice and another two may have been out of order. Like page numbering, MS Word will automatically number your chapters– even renumber them when you add chapters in the middle– if you set up your styles correctly. Here's how to do that.
 As outlined above, to bring up the Style dialogue box, locate the Format menu, select Style, and click on New again. Name this new style 'chapter' and set the 'Style Type', 'Style Based On', and 'Style for Following Paragraph' to 'paragraph'. In other words, you're piggy-backing your 'chapter' style on your previous 'paragraph' style to get the correct font, size, and double-spacing. As outlined above, to bring up the Style dialogue box, locate the Format menu, select Style, and click on New again. Name this new style 'chapter' and set the 'Style Type', 'Style Based On', and 'Style for Following Paragraph' to 'paragraph'. In other words, you're piggy-backing your 'chapter' style on your previous 'paragraph' style to get the correct font, size, and double-spacing. |
 As above, click Paragraph in the Format submenu, but this time set the indentation back to 0. Set the 'Outline Level' to Level 1; this is where the magic starts to happen. Click Okay. As above, click Paragraph in the Format submenu, but this time set the indentation back to 0. Set the 'Outline Level' to Level 1; this is where the magic starts to happen. Click Okay. |
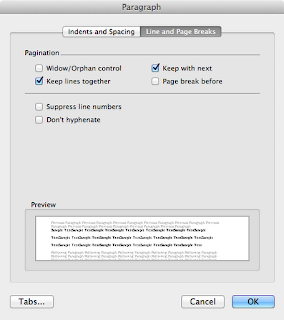
 As before, click on the Line and Page Breaks button. Turn on 'Keep with Next' and 'Keep Lines Together'. Click Okay. As before, click on the Line and Page Breaks button. Turn on 'Keep with Next' and 'Keep Lines Together'. Click Okay. |
 Open the Format submenu again and this time select Numbering… Open the Format submenu again and this time select Numbering… |
 You'll see a dialogue box titled something like 'Bullets and Numbering', which allows you to set up lists, but also controls outlines. If you select 'Outline Numbered', you may notice a thumbnail preview that has 'Chapter' in it, which can save us time. Select it and then click Customize. You'll see a dialogue box titled something like 'Bullets and Numbering', which allows you to set up lists, but also controls outlines. If you select 'Outline Numbered', you may notice a thumbnail preview that has 'Chapter' in it, which can save us time. Select it and then click Customize. |
 You shouldn't have to do much other than check settings, which should look similar to that shown here. You may click the Font button to confirm that we're indeed using bold Times. When satisfied, click Okay (once), Okay (again), and Close (or Apply if you happen to have the cursor positioned where you want a Chapter heading). You shouldn't have to do much other than check settings, which should look similar to that shown here. You may click the Font button to confirm that we're indeed using bold Times. When satisfied, click Okay (once), Okay (again), and Close (or Apply if you happen to have the cursor positioned where you want a Chapter heading). |
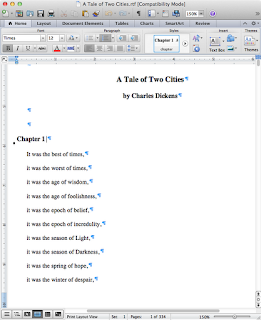
 Anytime you wish to create a new chapter, position the cursor at your chosen location. Then from the 'chapter' setting in your Styles button bar or from the Format > Styles > chapter menus, select chapter and congratulate yourself when the appropriately numbered chapter falls into place. Because we instructed the 'chapter' style that you wished to follow on with the 'paragraph' style, you should be find your everything in place to continue writing. Anytime you wish to create a new chapter, position the cursor at your chosen location. Then from the 'chapter' setting in your Styles button bar or from the Format > Styles > chapter menus, select chapter and congratulate yourself when the appropriately numbered chapter falls into place. Because we instructed the 'chapter' style that you wished to follow on with the 'paragraph' style, you should be find your everything in place to continue writing. |
 Enhance your template with your by-line and the heading as discussed last week. Save the template when you're satisfied. Enhance your template with your by-line and the heading as discussed last week. Save the template when you're satisfied. |
Now you're set to crank out that next award-winning novel or short story. Good luck!
 by Leigh Lundin


